In this MySQL tutorial, we are going to learn all about how to create MySQL Tables in the MySQL database. In the previous tutorial, we have seen how to create a new database in a MySQL server using CREATE DATABASE statement.
Here we will see step by step guide to creating a MySQL table using CREATE TABLE statement.
There are two ways to create a new table in the MySQL database.
- Using MySQL Client Tool
- Using MySQL Workbench Application
Headings of Contents
Create MySQL Table using MySQL Client Tool
Here we will create a MySQL table with the help of the MySQL client tool.
MySQL Create Table Syntax
The CREATE TABLE the statement allows us to create a MySQL table in the MySQL database.
The following syntax indicates the syntax for creating a new table.
CREATE TABLE [IF NOT EXISTS] table_name (
column1 definition,
column2 definition,
column3 definition,
.......,

) ENGINE=storage_engine;
Let’s break down all the above syntax into some smaller parts.
CREATE TABLEis the MySQL predefined keyword that allows us to create a new table. The Table name must be unique within a database.- IF NOT EXIST is an optional keyword in the MySQL CREATE TABLE statement, that allows checking table is already created or not. If the table already exists. it will ignore the command other it will create the database.
- table_name specifies the name of the database.
- Now, you have to specify the name of the columns with the definition. All the columns are separated by commas.
- Now, you can specify the storage engine for the table in the engine clause. You can use any storage engine from InnoDB and MyISAM.If you don’t want to specify the storage engine explicitly.MySQL uses the InnoDB storage engine default.
Since MySQL version 5.0, InnoDB became the default storage engine clause. The InnoDB storage engine supports various storage engines of relational database management systems like ACID property, referential integrity, etc.
Create MySQL Table
Let’s create a simple table in the previously created database. In the previous tutorial, we created a new database that was testing. Now it’s time to create a new table inside the testing database.
- Login into the MySQL client tool using the following command.
sudo mysql -u root -p MySQL asks root password to validate your credentials.
If you using the Windows operating system, Then you can directly open your MySQL client tool application and enter the root password.
- Display all existing databases using the following command.
SHOW DATABASES;Output
+--------------------+
| Database           |
+--------------------+
| college            |
| demodb             |
| information_schema |
| mydb               |
| mysql              |
| mysqldjango        |
| performance_schema |
| sakila             |
| sys                |
| testdb             |
| testing            |
| world              |
+--------------------+
12 rows in set (0.15 sec)- Select database testing to create the MySQL table below command.
USE testing;- Here, you can see we have a database, which we have created in our create MySQL database tutorial.
- Now, we are going to create students a table with the following details.
CREATE TABLE students (

st_id INT AUTO_INCREMENT PRIMARY KEY,
first_name VARCHAR(100) NOT NULL,
last_name VARCHAR(100),
course VARCHAR(100) NOT NULL,
created_at TIMESTAMP DEFAULT CURRENT_TIMESTAMP

);
If you got the following message, That means you have successfully created your MySQL table.
Query OK, 0 rows affected (0.72 sec)Let’s understand all the information in the students tables.
- First, we used the
CREATE TABLEstatement to create a MySQL table. - Specify the name of the table. In our case students is the name of the table.
- st_id is an integer-based column. It is also an auto-increment column. if you are inserting a new record into the students table without specifying the name of the st_id, Mysql will automatically generate a sequential integer id for the st_id. PRIMARY KEY ensures every st_id must be unique.
- first_name is a character-based column that supports only 100 characters and it should not be null.
- last_name is also a character-based column that supports a maximum of 100 characters and it can be null.
- course specify the course name of every student it can be null.
- created_at store the time during the creation of the new record.
- MySQL provides a command DESC table_name. This command shows all the descriptions of the table.
DESC students;After executing the above command, You will get the following output.
+------------+--------------+------+-----+-------------------+-------------------+
| Field      | Type         | Null | Key | Default           | Extra             |
+------------+--------------+------+-----+-------------------+-------------------+
| st_id      | int(11)      | NO   | PRI | NULL              | auto_increment    |
| first_name | varchar(100) | NO   |     | NULL              |                   |
| last_name  | varchar(100) | YES  |     | NULL              |                   |
| course     | varchar(100) | NO   |     | NULL              |                   |
| created_at | timestamp    | YES  |     | CURRENT_TIMESTAMP | DEFAULT_GENERATED |
+------------+--------------+------+-----+-------------------+-------------------+
5 rows in set (0.11 sec)
To display all the tables inside the currently selected database, you can use the following command.
SHOW TABLES;When the above command is successfully executed, You will get the following output.
+-------------------+
| Tables_in_testing |
+-------------------+
| students          |
+-------------------+
1 row in set (0.00 sec)
Create MySQL table using MySQL Workbench
There is another way to create a MySQL database table using the MySQL Workbench GUI application. MySQL Workbench is a MySQL database IDE that allows us to perform all the operations with help of the application.
Here we are going to create another table with the help of MySQL workbench.
- Open your MySQL workbench and login into the server with the help of a password.
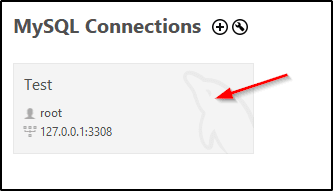
- If you are logged in successfully, you are able to see all the available databases on the left side.
- To create a new table, click on Create Table in Tables under the database name.
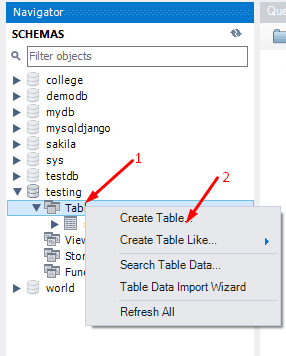
- Provide the name of the table and all the columns with definition and click on Apply the button.
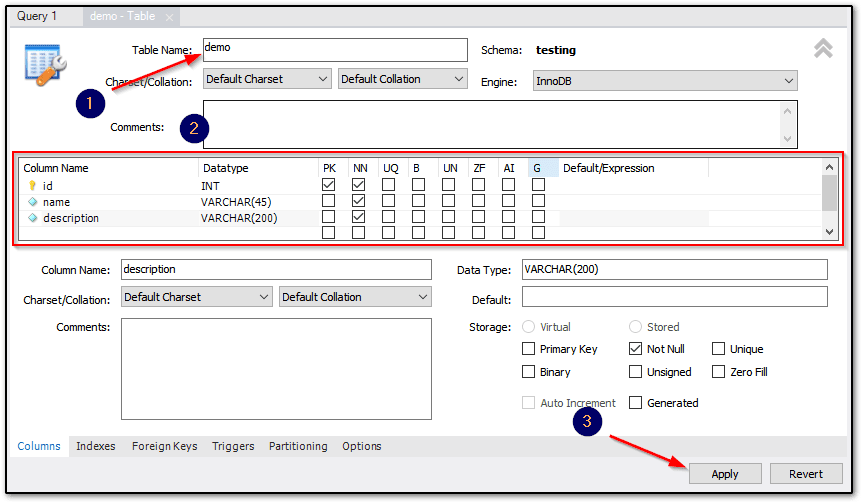
- Now, MySQL will show you the SQL script which you provided in the above step. if everything is ok click on
Apply.
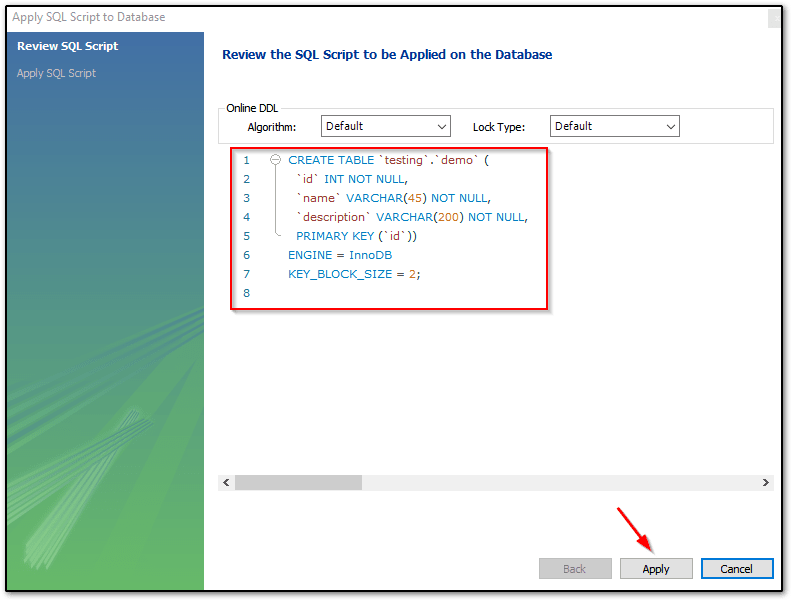
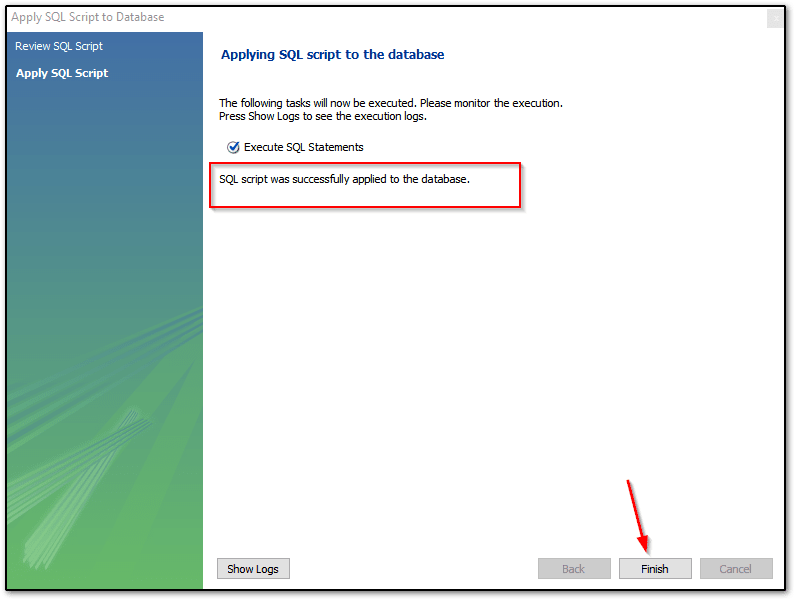
- After executing the above code successfully.MySQL shows you a successful message window. Now you are able to see all the available tables in the Tables section.
Conclusion
So, Today we have seen a total of two ways to create a MySQL Table. Both are the best options to create a new MySQL database table. If you don’t want to write a raw SQL query to create a new MySQL database table, you can go with the MySQL workbench application but it’s highly recommended to practice yourself with raw SQL query so that you can improve your SQL query.
I hope this article will have helped you. To learn more about MySQL databases, you can follow our MySQL database tutorial.
Reference:- Click Here

